🎄Swagger入门实战
🍭创建Maven项目并添加依赖
SpringBoot项目加入需要的依赖
<?xml version="1.0" encoding="UTF-8"?>
<project xmlns="http://maven.apache.org/POM/4.0.0"
		 xmlns:xsi="http://www.w3.org/2001/XMLSchema-instance"
		 xsi:schemaLocation="http://maven.apache.org/POM/4.0.0 http://maven.apache.org/xsd/maven-4.0.0.xsd">
	<modelVersion>4.0.0</modelVersion>

	<parent>
		<groupId>org.springframework.boot</groupId>
		<artifactId>spring-boot-starter-parent</artifactId>
		<version>2.5.6</version>
		<relativePath/> <!-- lookup parent from repository -->
	</parent>

	<groupId>com.bigbigmeng</groupId>
	<artifactId>swagger-start-20231219</artifactId>
	<version>1.0-SNAPSHOT</version>

	<properties>
		<maven.compiler.source>8</maven.compiler.source>
		<maven.compiler.target>8</maven.compiler.target>
		<project.build.sourceEncoding>UTF-8</project.build.sourceEncoding>
	</properties>

	<dependencies>
		<dependency>
			<groupId>io.springfox</groupId>
			<artifactId>springfox-spring-webmvc</artifactId>
			<version>2.10.5</version>
		</dependency>
		<dependency>
			<groupId>io.springfox</groupId>
			<artifactId>springfox-swagger2</artifactId>
			<version>2.10.5</version>
		</dependency>
		<dependency>
			<groupId>io.springfox</groupId>
			<artifactId>springfox-swagger-ui</artifactId>
			<version>2.10.5</version>
		</dependency>
		<dependency>
			<groupId>org.springframework.boot</groupId>
			<artifactId>spring-boot-starter-web</artifactId>
		</dependency>
		<dependency>
			<groupId>org.springframework.boot</groupId>
			<artifactId>spring-boot-starter-test</artifactId>
			<scope>test</scope>
		</dependency>
	</dependencies>

	<build>
		<plugins>
			<plugin>
				<groupId>org.springframework.boot</groupId>
				<artifactId>spring-boot-maven-plugin</artifactId>
			</plugin>
		</plugins>
	</build>
</project>
🍭创建一个Swagger的配置类
在Spring Boot应用中,
SwaggerConfig是一个配置类,它使用了@Configuration注解,是一个Spring配置类 用于定制和配置Swagger2
@EnableSwagger2WebMvc注解用于启用Swagger2的WebMvc支持,使得Swagger可以与Spring MVC一同工作,从而为Spring Boot应用程序生成API文档这个配置类可以包含一些特定的配置,例如定义哪个类或哪些类应该被Swagger扫描,或者定义Swagger的布局、主题等
⚡⚡⚡注意下面的
@EnableSwagger2WebMvc注解 这个注解会给SwaggerConfig配置类提供一些默认的配置 具体的默认效果可以在后面的运行页面截图看到
package com.bigbigmeng.config;

import org.springframework.context.annotation.Configuration;
import springfox.documentation.swagger2.annotations.EnableSwagger2WebMvc;

/**
@author Liu Xianmeng
@createTime 2023/12/19 16:25
@instruction Swagger配置类
*/

@SuppressWarnings({"all"})
@Configuration
@EnableSwagger2WebMvc
public class SwaggerConfig {
    // ...目前不做配置 Swagger
}
🍭配置项目启动端口
配置项目启动端口

启动项目 访问
localhost:8000/swagger-ui.html
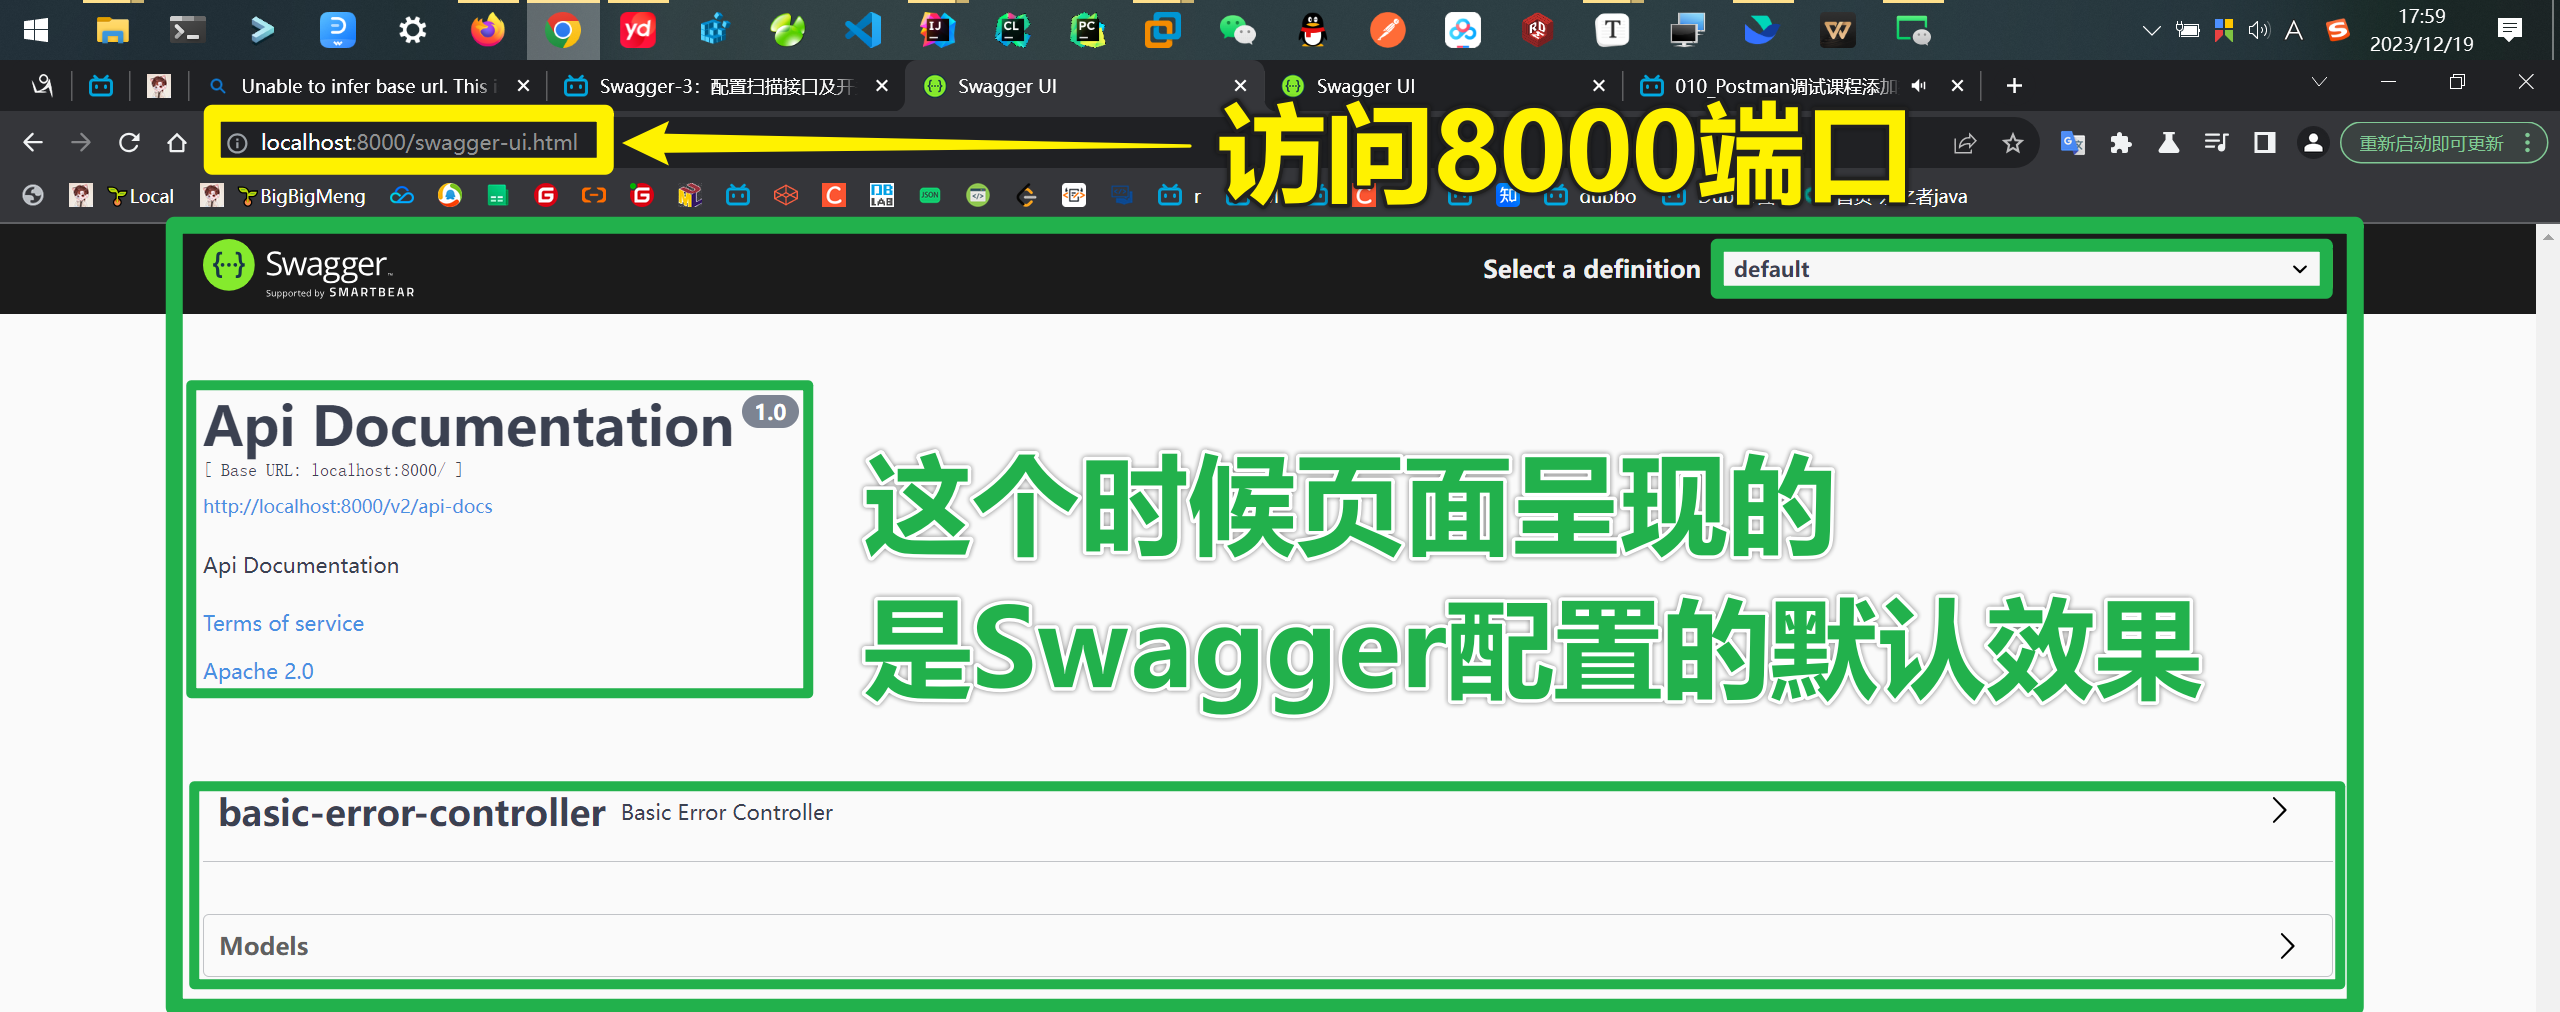
❓上面的默认页面效果从何而来呢?追查源码来看看
上面的默认页面信息从🎯
@EnableSwagger2WebMvc注解中来 下面我们来看看这个注解的源代码 注意这个注解被一个🎯@Import({Swagger2DocumentationWebMvcConfiguration.class})注解所修饰 里面的就是奥秘所在
package springfox.documentation.swagger2.annotations;
...
@Retention(RetentionPolicy.RUNTIME)
@Target({ElementType.TYPE})
@Documented
🎯@Import({Swagger2DocumentationWebMvcConfiguration.class})
@ConditionalOnWebApplication
public @interface EnableSwagger2WebMvc {
}
当我们使用
@EnableSwagger2WebMvc注解时,Swagger会为我们生成API文档,并在Web应用程序中提供API文档的访问 Swagger会扫描您的Spring应用程序中的注解,并自动生成API文档默认的配置来自Swagger的内部配置 Swagger提供了默认的配置类,这些类包含了Swagger集成的默认行为和外观
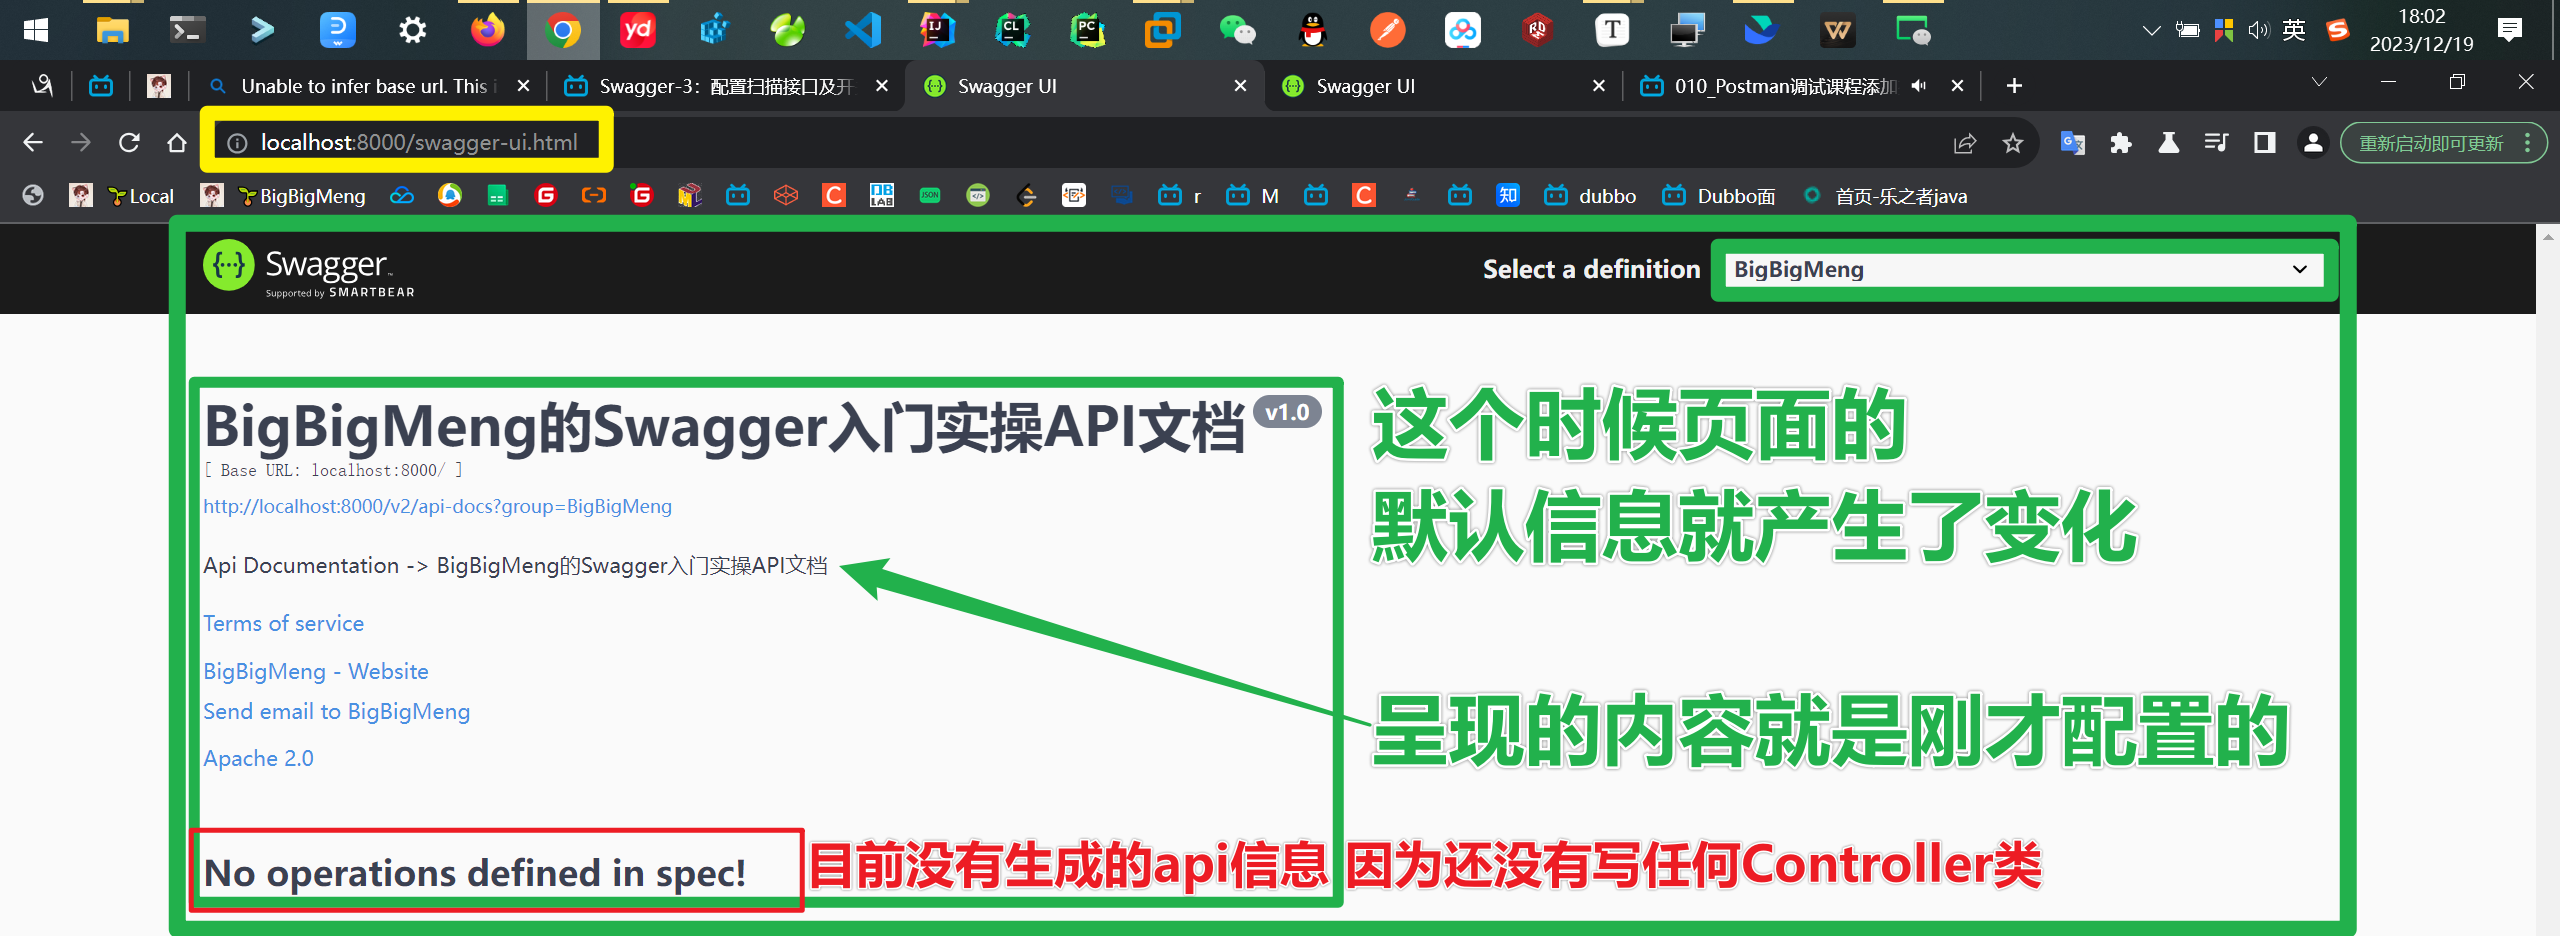
🍭尝试覆盖默认配置
接下来给SwaggerConfig添加一些自主的配置以覆盖默认的配置
/**
@author Liu Xianmeng
@createTime 2023/12/19 16:25
@instruction Swagger配置类
*/
@Configuration
@EnableSwagger2WebMvc
public class SwaggerConfig {
    /***************** 添加自主配置 开始...  *****************/

    @Bean
    public Docket docket(Environment environment){
        // 设置要显示的Swagger环境
        Profiles profiles = Profiles.of("dev","test");
        // 通过environment.acceptsProfiles判断是否在自己设定的环境当中
        boolean flag = environment.acceptsProfiles(profiles);

        /**
         * 一个用来作为Springfox框架的主要接口的构建器 提供合理的默认值和方便的配置方法
         */
        return new Docket(DocumentationType.SWAGGER_2)
            .apiInfo(apiInfo()) // 配置apiInfo信息
            .enable(flag) // enable是否启动了Swagger 如果是False 则Swagger不能在浏览器中访问
            .select()
            // 需要生成的api信息的Controller包 目前还没有写Controller类 当前为空
            .apis(RequestHandlerSelectors.basePackage("com.bigbigmeng.controller"))
            //.paths(PathSelectors.ant("/qi/**"))
            .build();
    }
    // 配置Swagger信息
    private ApiInfo apiInfo(){
        //作者信息
        Contact contact = new Contact("BigBigMeng", "https://bigbigmeng.cloud", "2751187368@qq.com");
        return new ApiInfo("BigBigMeng的Swagger入门实操API文档",
            "Api Documentation -> BigBigMeng的Swagger入门实操API文档",
            "v1.0", "urn:tos",
            contact, "Apache 2.0",
            "http://www.apache.org/licenses/LICENSE-2.0",
            new ArrayList());
    }

    /***************** 添加自主配置 结束...  *****************/
}
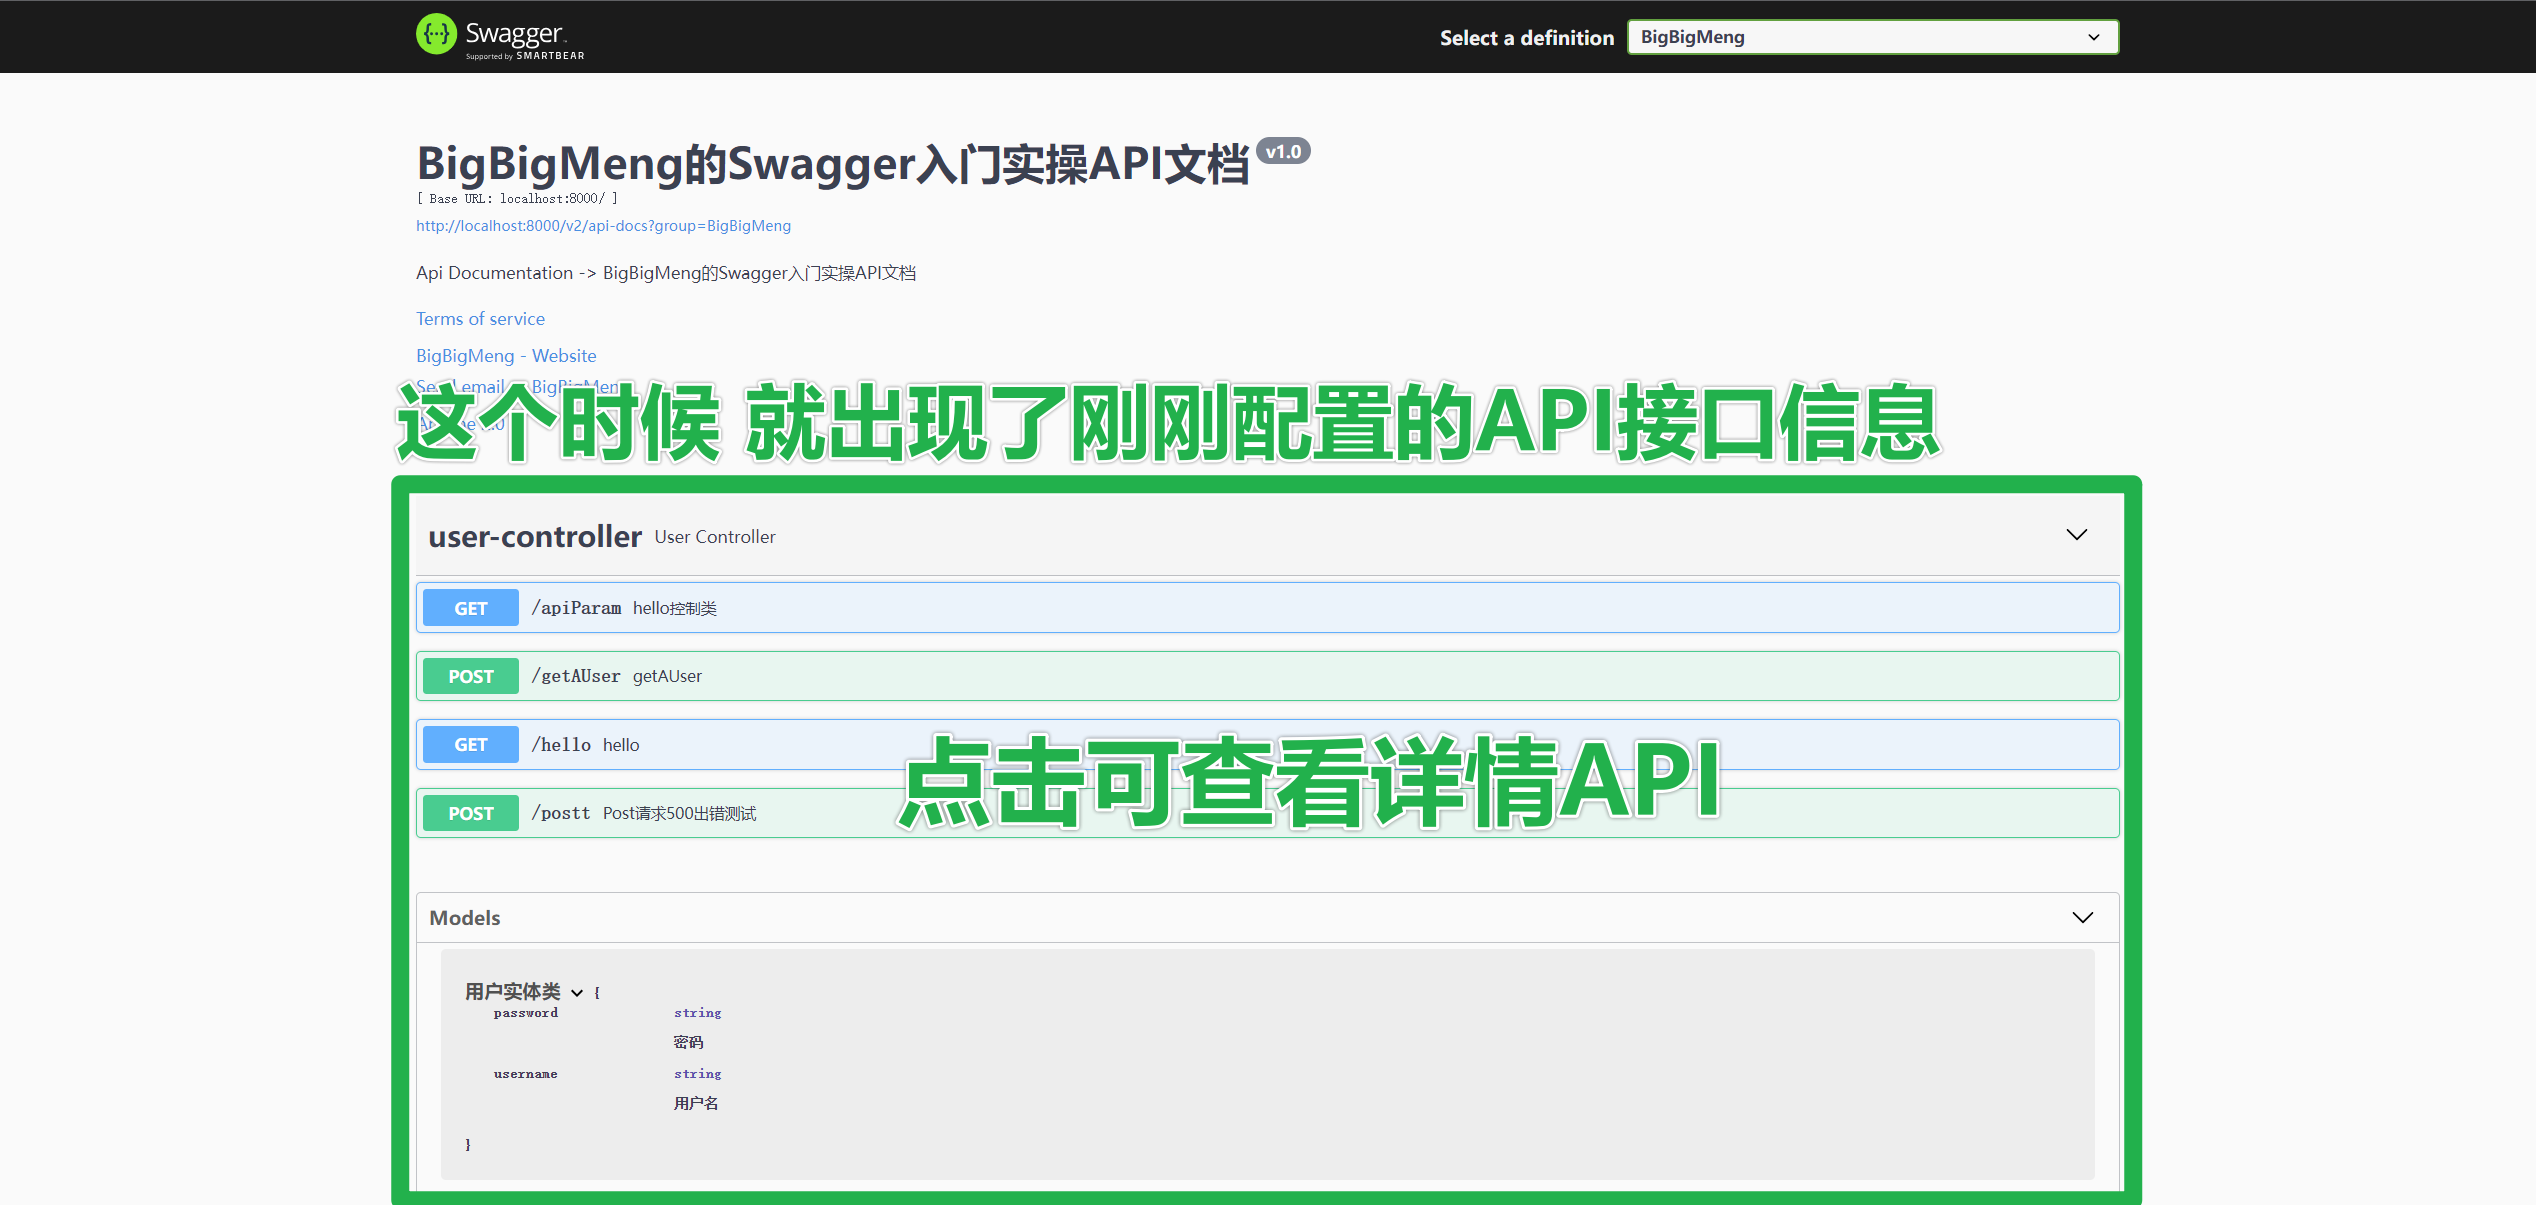
接下来运行代码并在浏览器查看运行结果 由于还没有写Controller类 所以页面没有生成任何API接口
🍭添加Controller类 生成API接口信息
🍩添加User Pojo类
首先 先来添加一个
UserPojo类作为准备 添加User对象之前 先添加lombok的依赖
<dependency>
    <groupId>org.projectlombok</groupId>
    <artifactId>lombok</artifactId>
    <version>1.18.10</version>
</dependency>
接下来 添加User Pojo类用于测试
@ApiModel注解用于定义一个类作为一个Swagger模型,去掉它会导致Swagger无法正确地生成该模型的文档 将无法描述该模型所代表的实体或对象的结构和属性(反向理解该注解的作用)@ApiModelProperty注解用于定义模型属性的描述信息,如名称、类型、是否必需等 去掉它会导致Swagger无法正确地生成该属性的文档 使得其他开发者难以了解该属性的详细信息(反向理解该注解的作用)
/**
@author Liu Xianmeng
@createTime 2023/12/19 18:28
@instruction 用户信息类
*/

@Data
@NoArgsConstructor
@AllArgsConstructor
@Builder
@ApiModel(value = "用户实体类")
public class User {
    @ApiModelProperty("用户名")
    public String username;
    @ApiModelProperty("密码")
    public String password;
}
🍩添加UserController类
然后 就可以开始写一个Controller类来验证API信息的生成啦
/**
@author Liu Xianmeng
@createTime 2023/12/19 18:26
@instruction
*/
@SuppressWarnings({"all"})
@Controller
@ResponseBody
//@RestController
public class UserController {
// 实践get请求 返回一个字符串
@GetMapping(value = "/hello")
public String hello(){
return "hello";
}
// 实践post请求 返回一个User对象
@PostMapping(value = "/getAUser")
public User getAUser(){
User user = new User("bigbigmeng", "passwd");
return new User();
}
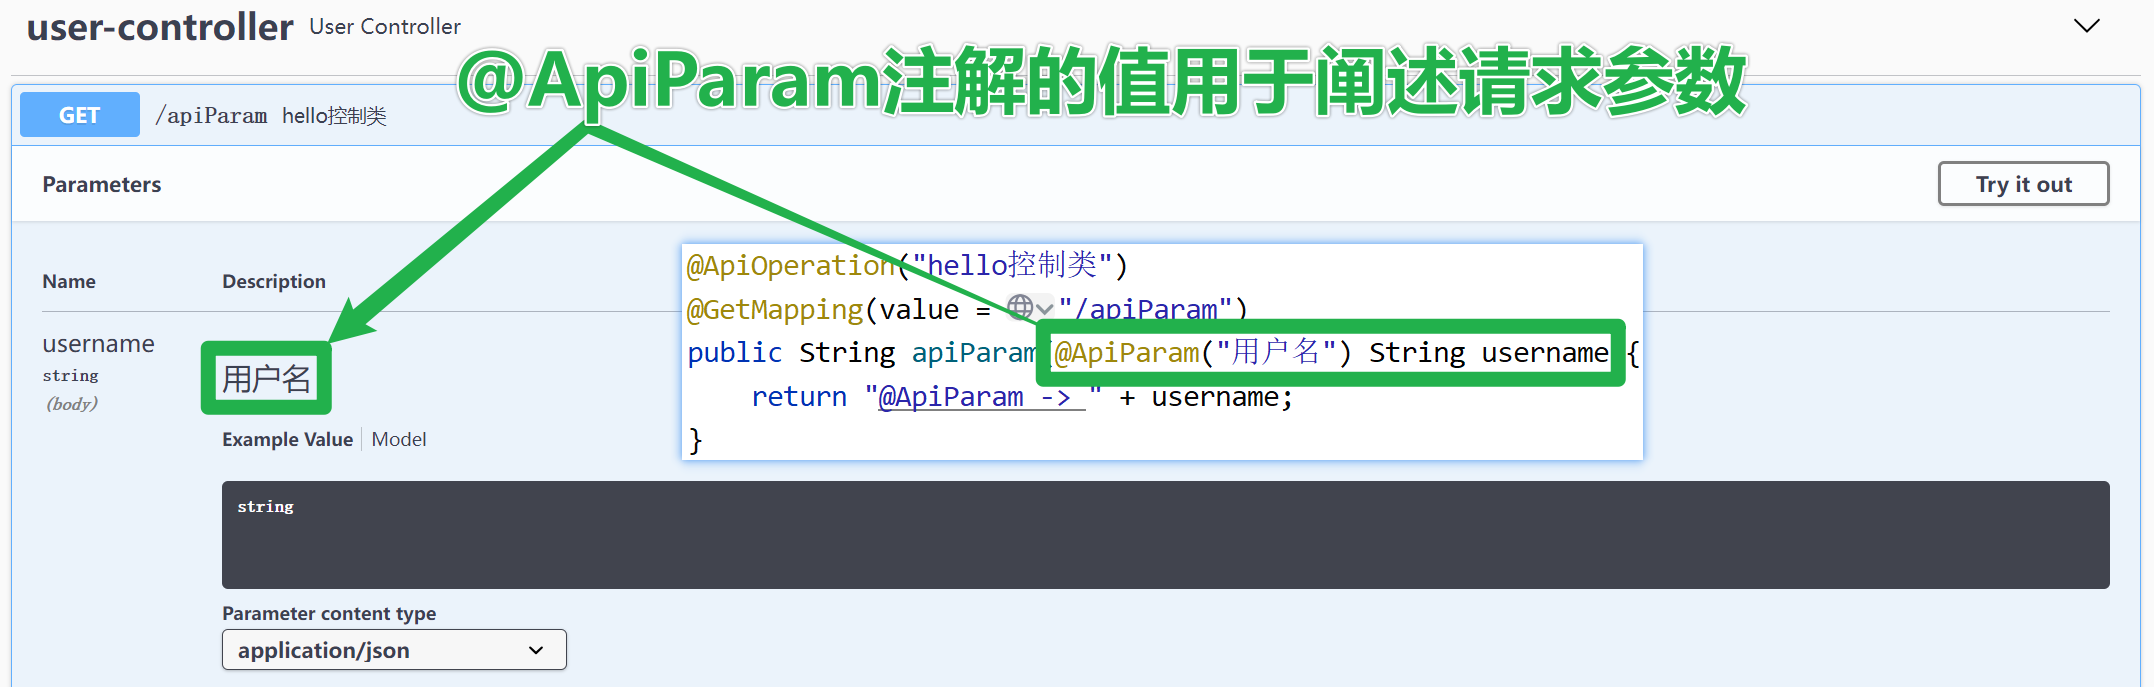
// 实践@ApiParam注解的使用
@ApiOperation("hello控制类")
@GetMapping(value = "/apiParam")
public String apiParam(@ApiParam("用户名") String username){
return "@ApiParam -> " + username;
}
// 实践请求500出错
@ApiOperation("Post请求500出错测试")
@PostMapping(value = "/postt")
public User postt(@ApiParam("用户名") User user){
int i=5/0;
return user;
}
}
需要注意的是 这个Controller类所在的包名在上面的SwaggerConfig配置类中🎯已经进行了配置
public class SwaggerConfig {
    /***************** 添加自主配置 开始 *****************/
    @Bean
    public Docket docket(Environment environment){
        ...
        /**
         * 一个用来作为Springfox框架的主要接口的构建器 提供合理的默认值和方便的配置方法
         */
        return new Docket(DocumentationType.SWAGGER_2)
            ...
            // 需要生成的api信息的Controller包 目前还没有写Controller类 当前为空
            .apis(RequestHandlerSelectors.basePackage(🎯"com.bigbigmeng.controller"))
            ...
    }
    ...
    /***************** 添加自主配置 结束 *****************/
}
⚡启动项目 查看页面生成的API结果
接下来把注解和生成的页面做一个对应 明确注解的使用与页面效果呈现的对应
(1)@ApiOperation注解用于阐述方法的作用
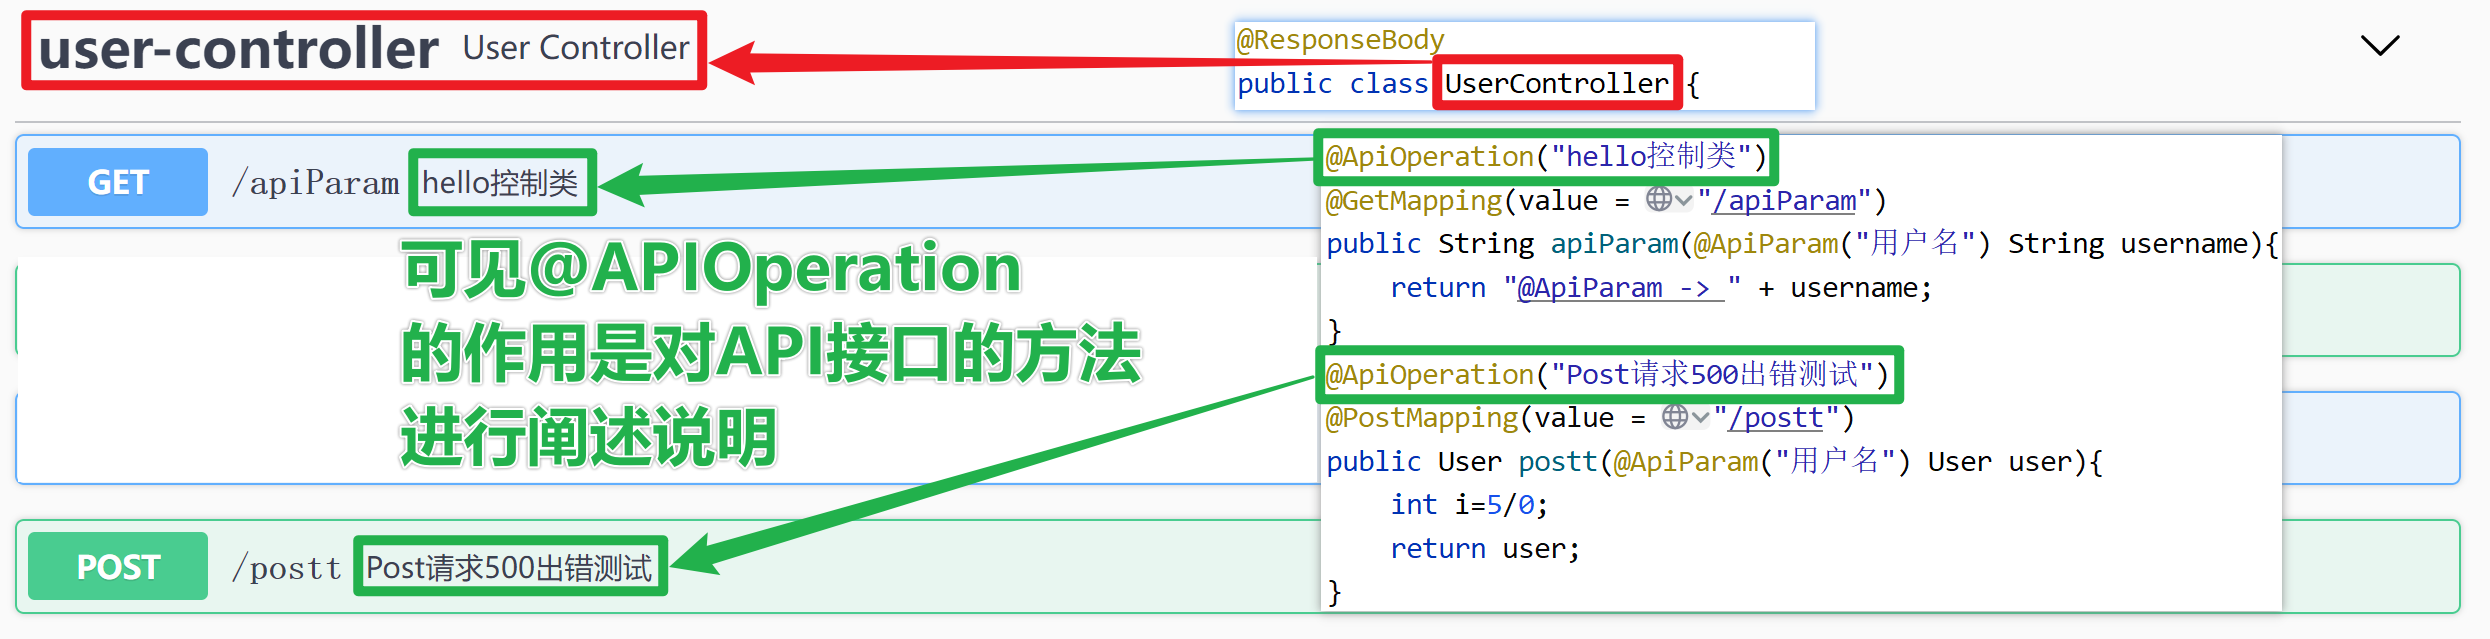
(2)@ApiParam注解用于阐述方法中参数的作用
(3)对/apiParam API执行测试
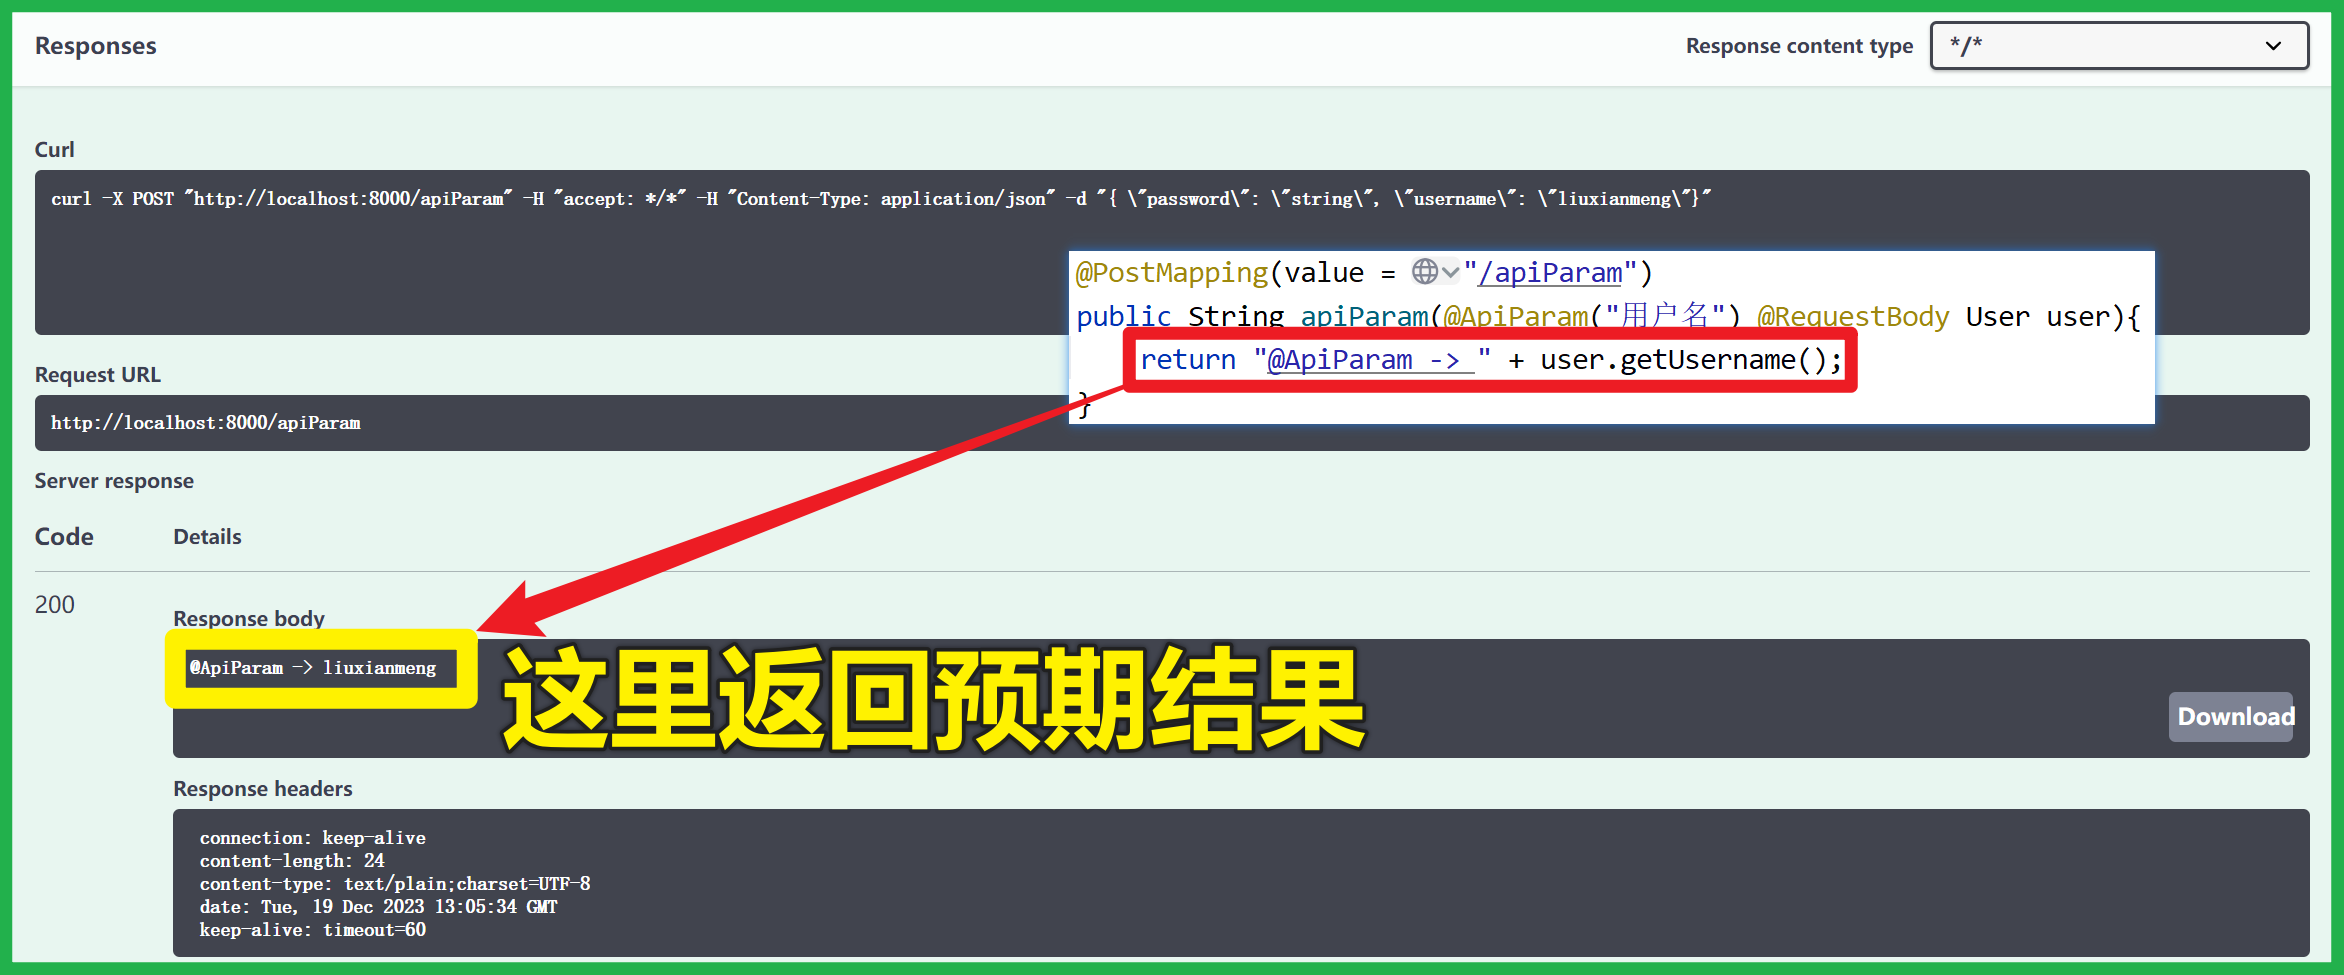
先将其修改为Post请求 并且添加@RequestBody注解 将String调整为User对象
@PostMapping(value = "/apiParam")
public String apiParam(@ApiParam("用户名") @RequestBody User user){
    return "@ApiParam -> " + user.getUsername();
}
页面执行测试
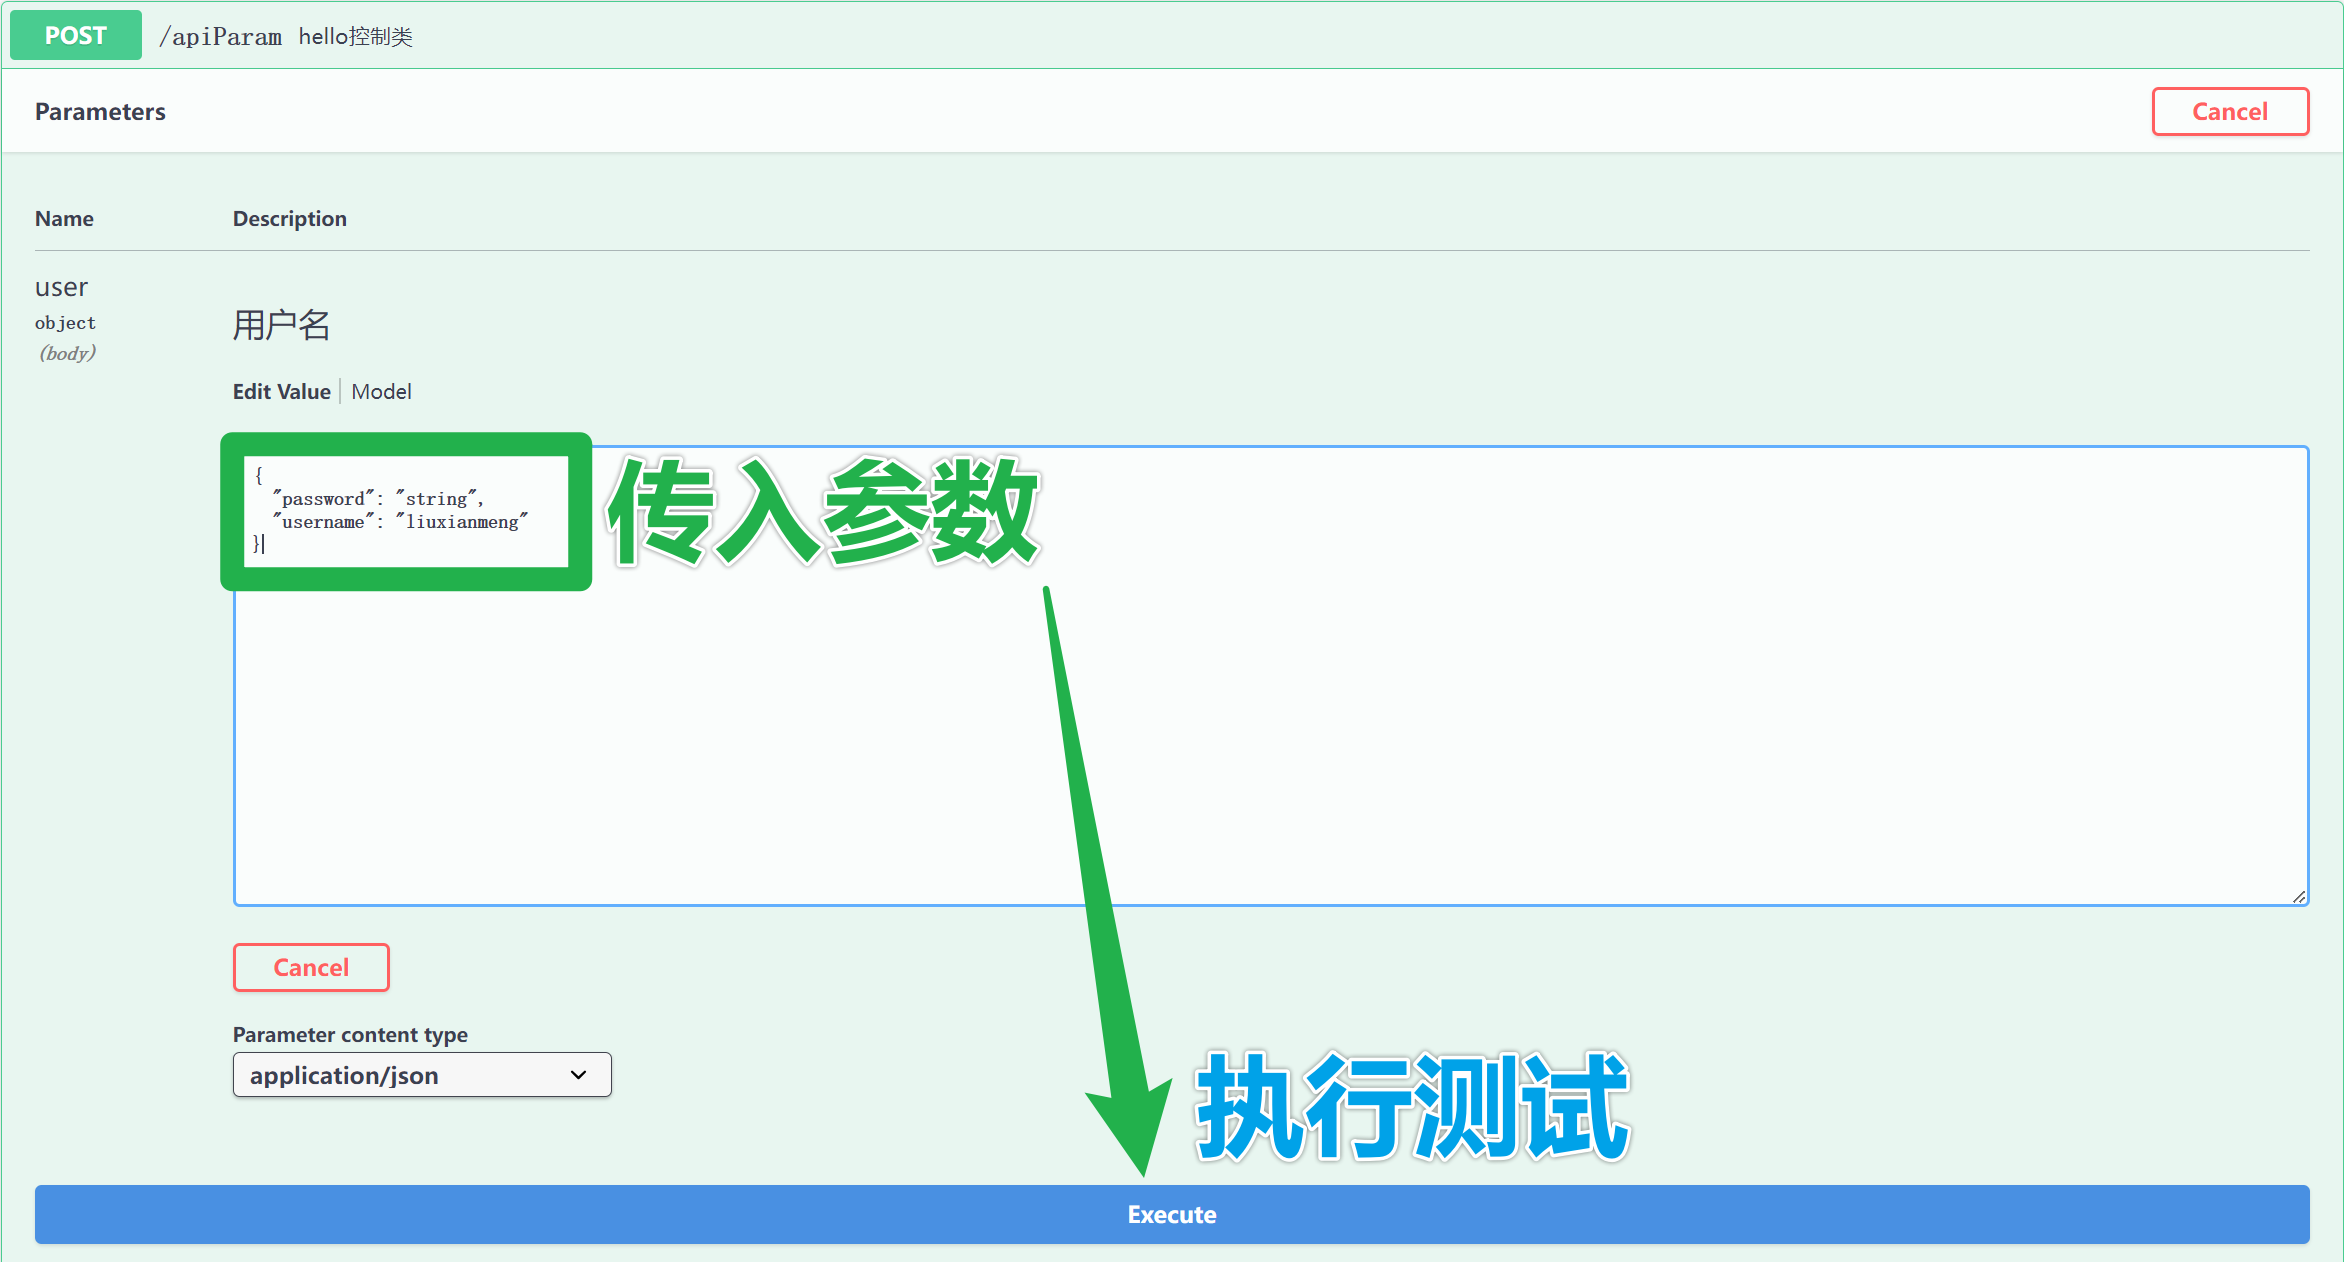
查看返回结果
(4)@ApiModel注解value值用于描述实体类

到此为止 Swagger入门实操就完成了 进一步的使用可以在后面持续进行探索
📑Swagger入门总结
(1)Swagger是好用的 后端的代码修改后只要发布 对应的页面即刻就能看到最新的API信息 还能对API进行对应的测试
(2)缺点是页面大量的空白处给体验带来了严重的影响 页面呈现不够紧凑 可读性不强 视觉感官不够舒适